Getting VisualVM to work remotely can be difficult so I’ve decided to record the steps that I use to connect to an Amazon EC2 instance.
I’ll prefix each step with which machine it should be run on. To be clear, we are running VisualVM on our local machine and trying to profile a JVM on a remote machine.
The steps are as follows:
LOCAL: Setup an SSH Tunnel to the remote machine on port 10000.
If you’re using the ssh command (linux or Mac) this would be done using
dynamic port forwarding:
ssh -D 10000 ec2-user@[ec2 ip or cname]
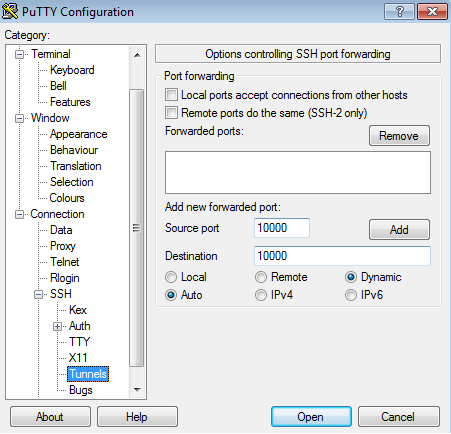
If you’re on Windows, then you are probably using Putty, so the tunnel would be
setup just like a regular SSH connection but add a Dynamic Forwarded Port under
Connection –> SSH –> Tunnels.
Leave this tunnel open while you monitor the JVM.
REMOTE: Enable JMX on the remote JVM
Add the following parameters to the JVM:
-Dcom.sun.management.jmxremote.port=9000
-Dcom.sun.management.jmxremote.ssl=false
-Dcom.sun.management.jmxremote.authenticate=false
REMOTE: Create a jstatd permissions file
Create a file named permissions.txt with the following contents:
grant {
  permission java.security.AllPermission;
};
REMOTE: Start jstatd
Run jstatd -J-Djava.security.policy=permissions.txt. Leave this running while
you monitor the JVM.
LOCAL: Open VisualVM
LOCAL: Enable VisualVM to use the SSH tunnel
- In VisualVM, open menu: Tools –> Options –> Network
- Select
Manual proxy settings - Uncheck
Use the same proxy settings for all protocols - Set SOCKS Proxy:
localhost, Port:10,000
REMOTE: Get the IP Address of the server
On Linux run ifconfig and generally you are looking for the ip address after
inet addr on eth0 but it may vary.
On Windows run ipconfig and you are looking for the IPv4 Address
LOCAL: Add the Remote Host to VisualVM
- In VisualVM, open menu: File –> Add Remote Host
- Add the IP Address from the previous step
- Under Advanced Settings, remove the default jstatd connection
- Click OK
- Right-Click the new host and select “Add JMX Connection…”
- Enter the IP Address from the previous step with port 9000 as the connection. This should look like: 10.0.0.1:9000.
- Click OK
- VisualVM should connect! You should now be able to monitor the remote JVM!